
Rook vs Rook + Bishop Endgame Tutorial
It is a technically drawn endgame that is practically difficult to play
Rook vs Rook + Bishop is a technically drawn endgame that is practically difficult to play. This is because the drawing techniques are not studied/practiced well. Many Grandmasters have lost in this endgame.
This blog will show strategy for winning and defending this classic endgame. Practicing the strategy is also required. There is a reason Grandmasters can struggle in this endgame.
Philidor Position
The Philidor Position is a winning position where the King is directly opposed to the other King on the back center and the Bishop blocks any checks. The winning strategy is about moving so the the opponent Rook has no good squares (to check or defend against the mate threat) due to the bishop covering them (the big theme). The Rook tries to defend checkmate but eventually it won't be able to. This explains the strategy:
The Special Combo
The is a special combo for the unrotated version that can be memorized for the best defense. If the King is on e-file then it is the opposite (Right-Left becomes Left-Right). If the board is rotated then you do the same. The special combo applies to Re1, if Re2/e3 the combo is shorter. There are also other combos shown. The study shows the combo and the simplified combos if the opponent plays worse:
The Special Combo:
- Up-Down
- Right-Left(b7)
- Bishop x3
- Check Right Check
- Rb4-Ra4
These combos are to help you have muscle memory. After practicing based on the combos you will have a more intuitive feel for the position.
Because this is one of those positions where trying to comprehend it without playing the moves can get confusing. Grandmasters have gotten the position in a Blitz game, but didn't win. So muscle memory will help feel the interaction between the pieces.
You should practice the combo here to get muscle memory. The computer always does the mainline which is the main combo. This will still help you get the feel of the position. Also practice the flipped and rotated versions. This applies to all the positions and defense shown in this blog. Because in a game the position can arise on all sides of the board and in flipped configurations.
Tip: It is best to practice against a knowledgeable human. Stockfish does not try to win this endgame and is even willing to trade rooks. This means that practicing anything other than winning mainline Philidor and Lolli positions will not be helpful.
Lolli Position
King is close to the corner. Very similar to Philidor. This is easier. Short side - Bishop x 3 - Check - Ring around the Rosie.
Cochrane Defense
The Cochrane Defense applies when your King is on the four centre columns and the opposing King is opposite with a distance of two squares.
1. Pin the Bishop to the King. This makes it awkward for Black to coordinate.
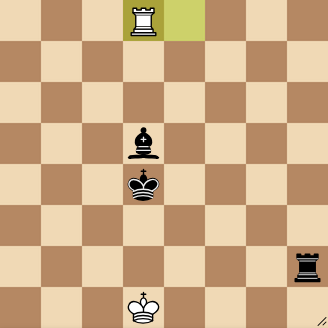
2. Move in the Opposite Direction of the King. This means after the bishop moves you can play Rd2 and that the Black King is seperated by the d-file barrier.
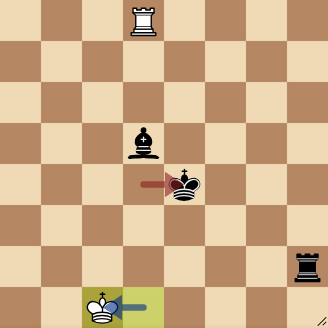
3. Try trading rooks if they cut your King off with their Rook.
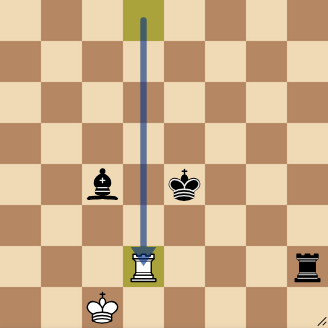
4. Keep moving Rook on the file until the opponent either moves bishop or King. If Rh2 then Rd2 again to try trade Rooks.
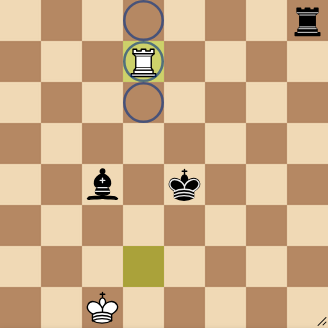
5. If they advance their King/cut off of with Bishop then advance your King forward.
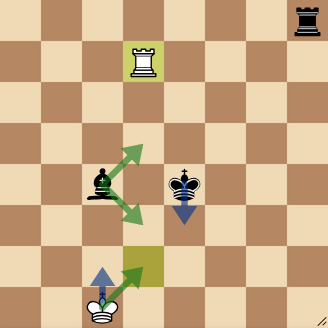
6. A Cochrane Defense may reemerge rotated.
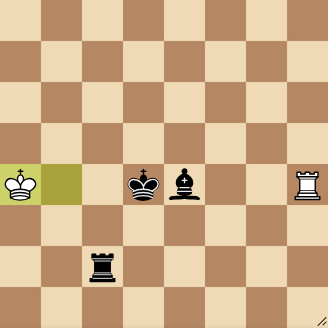
The only danger is step 3-5, the study shows the different scenarios. This area is not covered well in endgame tutorials due to the fact that there are different ideas that can be employed, so when GMs play that stage, they are using common sense and calculation as opposed to a memorized formula.
I have created a formulaic solution to help with this.
The most difficult part is after the Cochrane King shift.
Second Rank Defense
This is for worst case scenarios.
1. Rook and King on Second Rank (e.g. Rc2 and Ke2). Applies to opposite version and rotated version.
2. Move Rook back and forth if you can.
3. Use the Stalemate trick when the opponent plays Rook on third rank and Bishop on third rank.
The study shows how:
You may also like
 FM MathiCasa
Chess Football: A Fun and Creative Variant
Where chess pieces become "players" and the traditional chessboard turns into a soccer field thibault
How I started building Lichess
I get this question sometimes. How did you decide to make a chess server? The truth is, I didn't. ChessMonitor_Stats
Where do Grandmasters play Chess? - Lichess vs. Chess.com
This is the first large-scale analysis of Grandmaster activity across Chess.com and Lichess from 200… RuyLopez1000
The History of Chess Geometry
The Wonderland of the Impossible. CM HGabor
How titled players lie to you
This post is a word of warning for the average club player. As the chess world is becoming increasin… RuyLopez1000