
The Beauty of interference
In this article I show you more motifs from the world of chess combinations, in particular intersection themes, which are commonplace in chess composition but occur only rarely — if at all — in over-the-board play.
Grimshaw
Basic idea
One such motif is the Grimshaw. It is named after the Englishman Walter Grimshaw, who lived from 1832 to 1890. Walter Grimshaw was a popular and strong amateur player. Around 1876, he even defeated the future World Champion Wilhelm Steinitz in a casual game. The exact notation of that game remains disputed, as Steinitz denied the published notation of the game — though not its result.
The defining feature of the Grimshaw motif is that two friendly line pieces have a common intersection point on their lines of action and interfere with one another when one of them occupies that square. A composition by Werner Speckmann illustrates this mechanism in its simplest and clearest form. It is a mate in 2 and as usual in direct mate chess compositions it is white to move.
The black rook and the black bishop share a common intersection point on d5. White exploits this by playing the key move 1.Qa2!, threatening 2.Qg8#.
Black can prevent Qg8# only by interposing either the bishop or the rook on d5.
However, both 1...Bd5 and 1...Rd5 weaken Black's position in such a way that the other piece can no longer perform its defensive task, allowing new mating ideas to appear.
After 1...Rd5, White plays 2.Qa8#, since the bishop has been blocked.
After 1...Bd5, the hidden 2.Qa3# follows, because the rook can no longer interpose on c5.
1...Nf6 is a sideline, after which 2.Qf7# delivers mate.
A more complicated Grimshaw
A richer example is a composition by Loshinskij & Umnov. Here we see an underpromotion that triggers three different Grimshaw mechanisms. It is also a mate in 2
The key move is 1.f8N!, threatening 2.Qe6#, since the black knight on d4 is pinned.
Black can try to defend by placing a piece on e7. Regardless of which piece he chooses, it blocks the other one, which White immediately exploits on the next move.
First Grimshaw:
1...Re7 2.Nef6#
1...Be7 2.Qf7#
Black can also place a piece on c7 in order to provide his king with an escape square on the c-file, should White attempt 2.Qe6. This defence also fails because of the mutual interference.
Second Grimshaw:
1...Rc7 2.Nb6#
1...Bc7 2.Bf7#
The third Grimshaw occurs on d3. Black's idea is to unpin the knight on d4, allowing it to capture the queen appearing on e6. Once again, however, the mutual interference defeats the defence.
Third Grimshaw:
1...Rd3 2.c4#
1...Bd3 2.Nc3#
Novotny
The Grimshaw is closely related to the Novotny theme. But there is also a big difference:
In the Novotny theme, White sacrifices a piece on the intersection square, thereby temporarily blocking the lines of action of both black defenders. Black can capture the sacrificed piece with only one of them, leaving the other defender ineffective, which White exploits.
In contrast, no piece is sacrificed on the intersection square in the Grimshaw. Instead, Black is forced to occupy the intersection himself, thereby causing his own pieces to interfere with one another.
An example of a Novotny featuring multiple queen sacrifices by White is a composition by E. Schulze, Schach-Aktiv, 1984. White mates in 3.
At first glance, the position shows that White could potentially mate with Nd3#, Nf3#, Ng6#, or exf4#. However, all of these mating squares are still adequately defended by Black's rooks and bishops.
The key move is 1.Rb4!, clearing the way for the queen. If White were to move again immediately, the next move would be 2.Qd5+ (the first Novotny). Black is forced to capture the queen, but regardless of how he captures, one of his defenders always blocks the line of the other.
Black therefore has two defensive ideas to stop Qd5+.
- The bishop on b7 must defend the square f3. In order to avoid White's Novotny on d5, Black defends f3 with his bishop "from the other side". The best square for this is h1. Black therefore plays 1...Bh1, so that White can no longer play 2.Qd5, because 2...Rxd5 does not block the bishop.
- Similarly, the rook on d6 must defend the square d3. Since d5 lies between d6 and d3, the rook can move to d1, 1...Rdd1, from where it continues to defend d3, thereby removing the intersection on d5.
Such black moves that pass beyond an intersection square are known as anti-critical moves.
In the first defensive idea, 1...Bh1, however, a new intersection square appears to Black's misfortune—this time on g2. The rook on g1 must defend the square g6. White immediately exploits this with 2.Qg2! (the second Novotny). Black can only choose whether to be mated by 3.Nf3# or 3.Ng6#.
In the second defensive idea, 1...Rdd1, Black is equally unfortunate. A new intersection arises on d2, since the bishop on c1 must prevent the move exf4#. White therefore plays 2.Qd2! (the third Novotny) and mates on the following move.
All other black moves are merely sidelines.
Plachutta
After studying the Novotny and the Grimshaw, one may naturally ask why it has to be (mainly) a rook and a bishop that interfere with each other. Would the same idea also be possible with two identical pieces, for example two rooks or two queens?
First Plachutta
Josef Plachutta (1827 - 1883), a slovenian chess componist, asked himself the same question and delievered in 1858 the answer with following mate in 4:
White plays 1.Qf3 (threatening d4#), and Black replies with 1...Nc5, creating an escape square on d6.
It is precisely in this position that White's idea comes into play.
Note that White potentially threatens Bc7 as well as Qg3, but both threats are still sufficiently defended by the rooks.
White's next move must therefore destroy the coordination of the black rooks.
This is achieved by 2.Rg7!!
Of course, no matter which black rook captures the white rook, the squares c7 and g3 are still defended afterwards. However, instead of two rooks each defending one square, a single rook is now defending two squares. Whichever rook captures on g7 becomes overloaded, and White succeeds by deflecting that rook by carrying out either 3.Bc7 or 3.Qg3. White only has to be careful to execute the correct threat first so as not to bring the "rear" rook back to life.
Plachutta in a real game
This motif appears only extremely rarely in actual over-the-board games. The only example known to me was played in 1914 between Siegbert Tarrasch and a team of opponents consisting of Davide Marotti, E. Napoli, de Simone, and del Giudice.
White could potentially play Qb7 as well as Rxc5. Black can still defend against both threats. However, the defenders share a common intersection square on c7.
White can exploit this with 1.Bc7!
The capturing defender becomes overloaded. Here too, White merely has to make sure that the next move is played in such a way that the rear piece cannot resume its defensive duty.
The course of the solution makes it clear that a Plachutta can, in principle, never be realised in a mate in two, since White must spend one move deflecting the capturing defender.
A more complicated Plachutta
A considerably more complicated and richer problem was composed by the German Theodor Siers (1910 - 1991).
It is a mate in 6, and even Stockfish needs some time to find the solution (at least on my laptop).
It combines the Plachutta theme with a black Novotny.
In principle, White's play aims to bring down the black king by means of the manoeuvres Rg6–g7–a7# and/or Bh7–g8–b3#.
Black's defensive resources consist of covering the potential mating squares a7 and b3 with a black queen, as well as a Novotny on f7 by means of Nh8–f7, thereby interfering with White's attacking pieces.
- The direct attempt 1.Bg8 (threatening 2.Bb3#) still fails:
After 1...Qxg3 2.Rg7 g1Q, both squares b3 and a7 are defended, and Black meets White's Plachutta attempt 3.e3 with the Novotny 3...Nf7.
Depending on how White captures the knight, Black can defend by recapturing on e3 with the correct queen (4.Rxf7 Qgxe3! or 4.Bxf7 Qhxe3!). - The second attempt, 1.Rg8, leads only to a transposition after 1...g1Q 2.Bg8 Qxg3.
White therefore has to lure the wrong queen to e3.
This is achieved by playing 1.e3 and waiting to see how Black chooses to defend. Since White needs only two moves to reach b3 or a7, Black cannot afford to waste any time and must attack the square e3 immediately in order to guard the mating squares from there on the next move.
Depending on whether Black wants to achieve this with g1=Q or Qxg3, White plays in such a way that the wrong queen ends up on e3, where it becomes overloaded. Let us examine both variations.
- After 1...g1Q, White plays 2.Bg8, immediately threatening mate on b3. Black is therefore forced to defend with the newly promoted queen by playing 2...Qxe3. White now plays 3.Rg7, overloading the queen on e3, since Black can no longer cover a7 with his other queen.
Black's only remaining resource is 3...Nf7, setting a trap. If White carelessly plays 4.Rxf7?, Black gets back into the game with 4...Qxg3. White must of course play 4.Bxf7, maintaining the pressure. Whatever Black does next, for example 4...Qhxg3, White continues with the plachutta moves 5.Bb3 and 6.Ra7#. - White proceeds in exactly the opposite way if Black wants to occupy e3 with the h-queen by playing 1...Qxg3. White now plays so that Black's choice turns out to have been the wrong one:
2.Rg7 immediately threatens mate on a7. Black must defend with 2...Qxe3. However, after 3.Bg8, the square b3 seals Black's fate. Here too, the trap 3...Nf7 does not help Black. After 4.Rxf7 g1Q 5.Ra7, Black is helpless against 6.Bb3#.
For clarity, here are the variations side by side:
1.e3!
1...g1Q 2.Bg8! Qxe3 3.Rg7 Nf7 4.Bxf7 Qhxg3 5.Bb3 Qxb3 6.Ra7#
1...Qxg3 2.Rg7! Qxe3 3.Bg8 Nf7 4.Rxf7 g1Q 5.Ra7 Qxa7 6.Bb3#
Problem to solve
There is still much more to discover. Thousands of problems have given rise to different kinds of Novotnys, such as the Romanian, the Finnish, or the Azerbaijani Novotny. There are also problems in which White must first eliminate an existing Novotny of his own, thereby apparently strengthening Black. As the final problem has shown, these themes can also be combined very effectively.
The following chess composition by Damien Grossi from 1930 is left for you to solve. White to move mates in 3. After reading this article, the answer can stand out immediately. Feel free to post in the forum if you managed to solve it and when you enjoyed the article.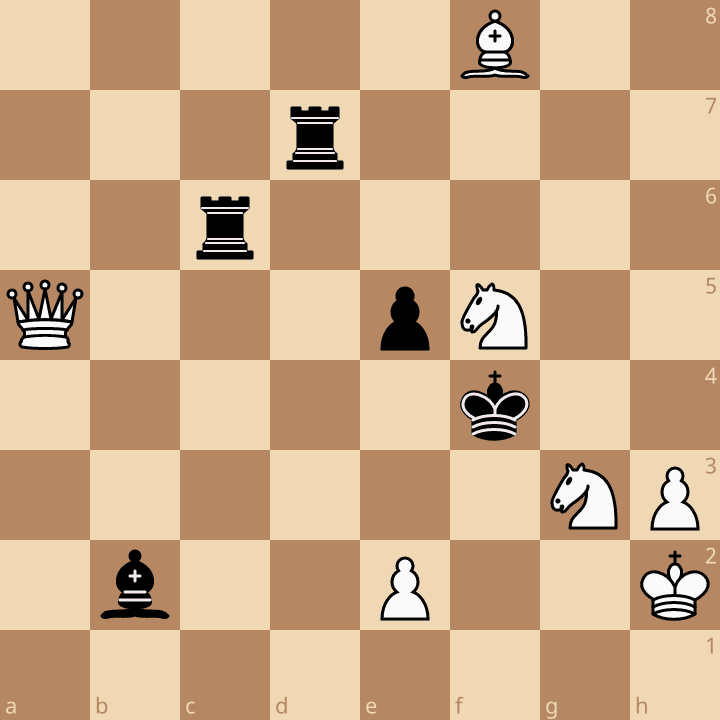
5B2/3r4/2r5/Q3pN2/5k2/6NP/1b2P2K/8 w - - 0 1
You may also like
 GetDiscombobulated
Interesting Patterns : Breaking the Bg4 Pin
In this Blog I'd like to explore examples of breaking the Bg4 Pin DeepHuman_95
The Beauty of chess compositions
What if some of the most beautiful ideas in chess never occur in actual games? If you're also tired … RuyLopez1000
History of the Knight: Increase Your Horsepower
An Exploration. CM HGabor
How titled players lie to you
This post is a word of warning for the average club player. As the chess world is becoming increasin… RuyLopez1000